
Managing rental properties can be quite a task, especially when it comes to tracking monthly payments. A rent ledger is essential for landlords and property managers to maintain accurate records of rental payments. Google Sheets, being accessible and easy to use, is a fantastic tool for creating a rent ledger.
What Is a Rent Ledger?
A rent ledger is like a running log of all the rental payments. Picture it as a financial journal that tracks every payment—when your tenant paid, how much they paid, and any balance still owed. It’s a helpful tool for landlords and property managers, ensuring payments are on time and making it easy to spot any late fees or missed payments. For tenants, it’s a reliable record of your payments, helping to keep everything clear and straightforward during your rental period.
Step 1: Open Google Sheets
Open Google Sheets and click “+ Blank” to create a new spreadsheet. To keep things organized, name your spreadsheet something intuitive like “Rent Ledger” followed by the year or the property name. You can name your spreadsheet by clicking “Untitled spreadsheet” at the top and typing in your preferred name.

Step 2: Set Up Your Columns
A rent ledger typically includes several key pieces of information. Set up the following columns in the first row of your spreadsheet:
- Date
- Tenant Name
- Property Address
- Property Type
- Payment Method
- Rent Due
- Rent Paid
- Balance
- Late Fee
- Notes

Step 3: Input Sample Data
To ensure your ledger works as expected, input some sample data. Under the “Date” column, enter a few different dates. Add tenant names, addresses, and the amounts due and paid.

You can use dropdown menus for recurring information, such as Payment Method and Property Type. First, select the cells and click Insert > Dropdown. Now, add the options, such as Full Payment, Installment, Residential, or Commercial.

Step 4: Calculate Balances Automatically
To automate the balance calculation, click on the cell in the “Balance” column of the first row where you want the balance to appear (e.g., F2). Enter the formula: =G8-F8, where G8 is the “Rent Paid” and F8 is the “Rent Due.”

This will subtract the amount due from the amount paid, showing any outstanding balance or overpayment. Then, drag the fill handle (the small square at the bottom-right corner of the cell) down the column to apply the formula to other rows.
Step 5: Add Conditional Formatting (Optional)
Conditional formatting helps to identify important data, such as overdue payments, visually. Highlight the “Balance” column, click on “Format” in the menu, and select “Conditional formatting.” Set up a rule that changes the cell color if the balance is less than zero, indicating an overdue amount. For instance, choose “Less than” and set the value to 0, then select red.

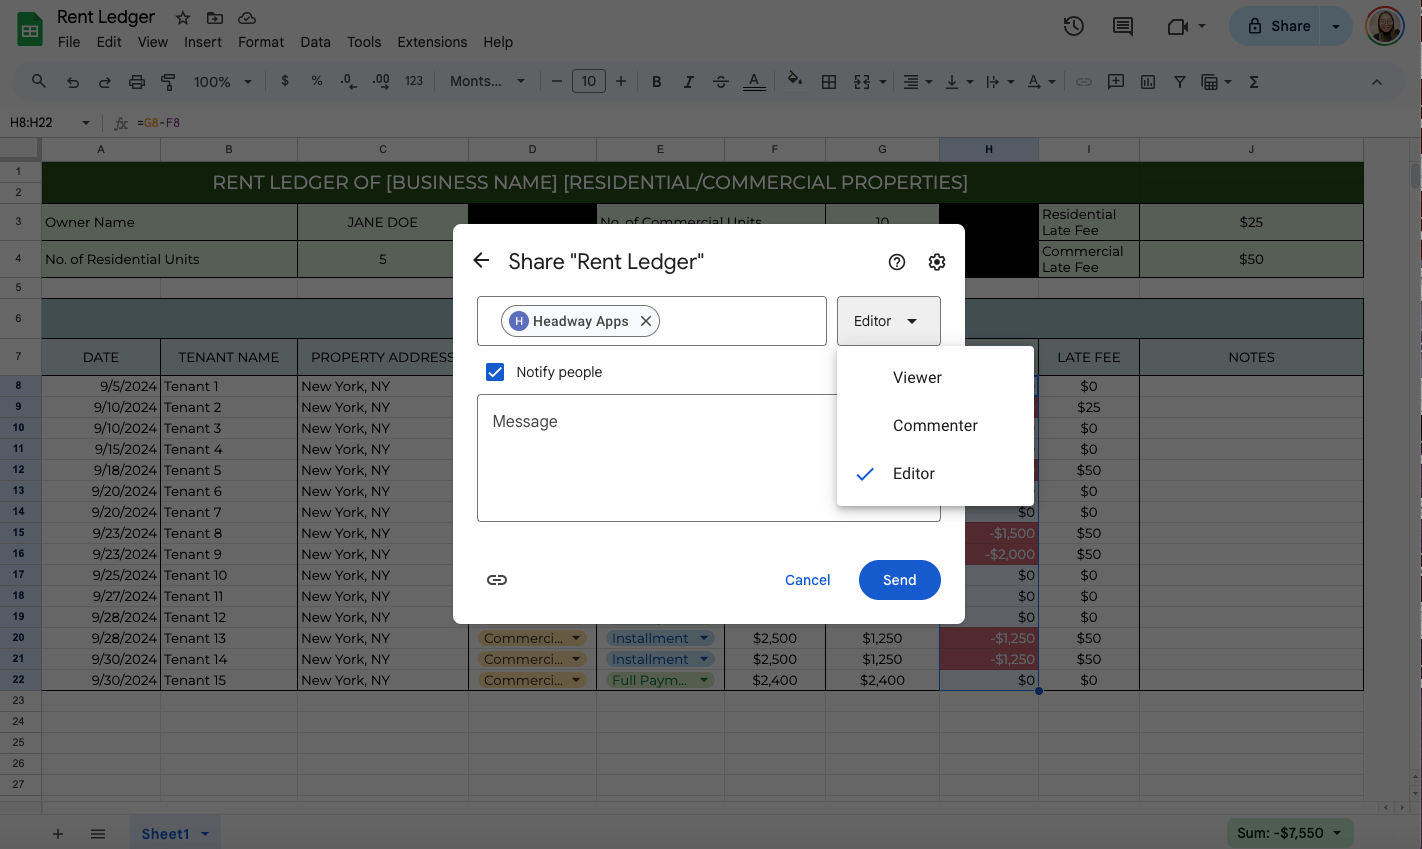
You might need to share the rent ledger if you manage properties with others. Click on the “Share” button in the top-right corner. Enter the email addresses of those you want to share the document with. Choose their permission level (Viewer, Commenter, or Editor), and click “Send.”
Get the Free Rent Ledger Template
Get a copy of the free Rent Ledger Template. I’ve populated some cells as examples, but you can customize them as needed.
Final Thoughts
A rent ledger in Google Sheets is a powerful tool for staying organized and managing rental payments effectively. With your template ready, you can quickly track rent payments, ensure accuracy, and maintain transparent records. This template can be customized further to suit your specific needs, such as adding new columns or integrating with other Google Sheets features.
Frequently Asked Questions
Can I protect certain cells or ranges to prevent accidental changes?
Yes, Google Sheets allows you to protect specific cells or ranges. Highlight the cells or range you want to protect. Then, right-click and select “Protect range.” Set permissions to restrict editing access to specific users or roles and click “Done” to apply the protection.
What function can I use to summarize yearly rent payments in Google Sheets?
To summarize yearly rent payments, you can use the SUM function. If you organize payments by date, you can sum up a year’s worth of payments using a formula like =SUMIF(DatesRange, “2023”, PaymentsRange), where DatesRange is the range of cells containing the dates, and PaymentsRange is the range of cells with the payment amounts. Customize the year and ranges according to your ledger’s setup.
The Bottom Line:
One keeps you awake. The other gets work done.
A month of coffee: $150
A month of FileDrop: $19
Why not have both?

