
Managing contacts can quickly become overwhelming, especially when juggling information from various sources—clients, colleagues, or personal connections. A well-organized contact list helps you keep everything in one place, making it easy to find key details whenever needed. Google Sheets is an ideal list creation tool because it’s free, flexible, and accessible from anywhere.
What Is a Contact List and Why Should You Have One?
A well-organized contact list is more than just names and numbers—it’s your gateway to streamlined communication, stronger relationships, and quick access to the people who matter most. It helps you stay connected, manage relationships, and respond swiftly in emergencies.
For businesses, it’s a vital tool for personalized communication, fostering trust and loyalty with clients. In short, a contact list isn’t just data; it’s a key to nurturing meaningful connections that support your personal and professional growth.
Step 1: Open a New Google Sheet
To begin, log into your Google account and open Google Sheets. Once there, click the plus sign (+) to open a new, blank sheet. Then, rename your spreadsheet with “General Contact List” for proper organization.

Step 2: Set Up Your Headers
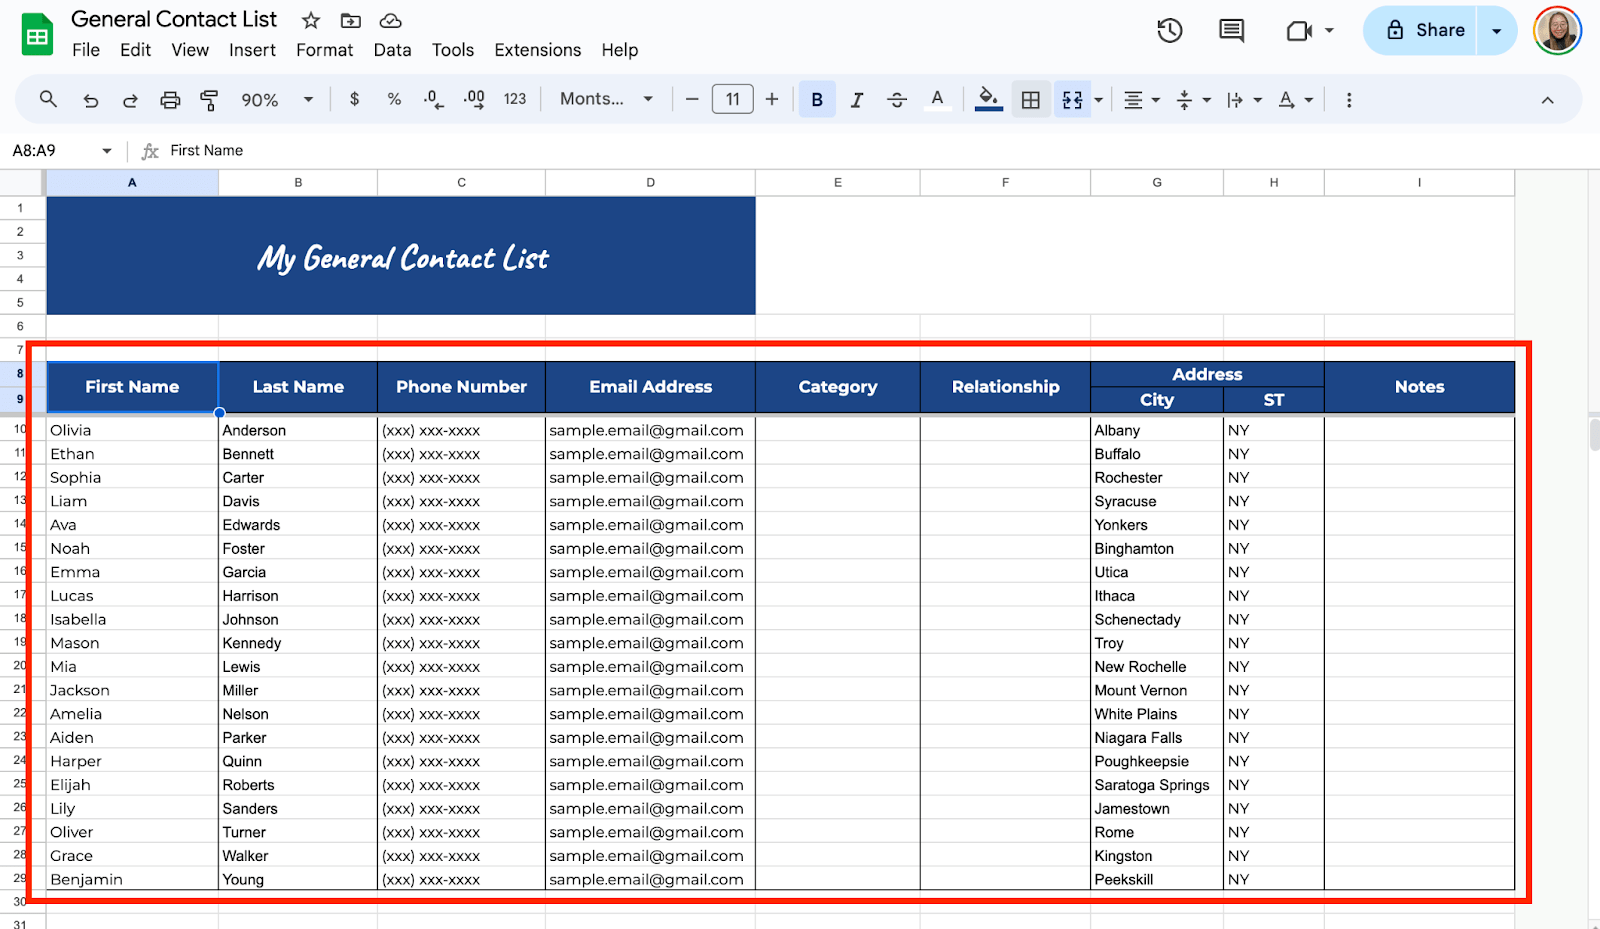
At the top of your sheet, you’ll want to create headers to organize the information for each contact. You can start by entering the following headers in the first row:
- First Name
- Last Name
- Phone Number
- Email Address
- Category
- Relationship
- Address
- Notes
These are the basics, but feel free to adjust them to fit your needs.

Step 3: Adjust the Formatting
Once you’ve added your headers, making them stand out is a good idea. You can highlight the entire first row, then click the bold (B) icon to make the text bold.

You can also change the background color of the header row. To do this, click the paint bucket icon and choose a color that suits your style.

If your contact list will have a lot of data, consider freezing the header row. That way, as you scroll down, the headers will stay visible. Go to the View menu, select Freeze, and choose 1 row.

Step 4: Start Adding Contacts
Now, you can begin filling in the contact information under each column. You can type directly into each cell, and Google Sheets will automatically save your progress.
If you already have contact information stored in Google Contacts, you can easily export it to Google Sheets.
First, go to Google Contacts, and on the left side, click Export. In the pop-up window, you can export all contact information or only specific groups.

Then, select the format as Google CSV, recommended for Google Sheets. After that, click Export, and you will see a file named contacts.csv that has been downloaded to your computer.

When importing your contacts to Google Sheets, open your current Contact List sheet, click File > Import, and choose Upload. Select the contacts.csv file you downloaded from Google Contacts.

In the import options, insert the data into the current sheet. Once imported, ensure the data aligns correctly with your headers. Keep in mind that you might adjust and format things to match your current template setup.

Step 5: Add Dropdown Lists for Recurring Information
If you’re working with labels like “Category,” you might want to use dropdown lists to keep the information consistent.
To do this, select the column where you want the dropdown. Go to the Data menu and select Data validation, then under Criteria, choose Dropdown. Now, add the options that you want to use.

Step 6: Add Filters for Quick Searches
As your contact list grows, it can become harder to find specific information. To make searching easier, you can add filters.
To do this, highlight the row with your headers. Go to the Data menu and select Create a filter. Small filter icons will appear next to each header. Click on any icon to filter or sort your contacts by that column.

Step 7: Protect Your Data
If you share this contact list with others, you should protect certain parts of the sheet to prevent accidental changes.
Highlight the columns you want to protect. Right-click and select Protect range. In the pop-up window, set the permissions for who can edit those columns.

Step 8: Make it Accessible on All Devices
One of the best things about Google Sheets is that it’s cloud-based, meaning you can access your contact list from any device. You can even share it with others by clicking the Share button in the top-right corner and choosing their permissions.

Get the Free Contact List Template
Get a copy of the free Contact List template. I’ve populated some cells as examples, but you can customize them as needed.
Final Thoughts
Google Sheets is a flexible tool for managing contact lists. The ability to customize everything—formulas, filters, dropdowns—makes building a system tailored to your needs easy. My tip is to start simple and gradually add features as you get more comfortable with the tool. The more you explore, the more you’ll learn how much Google Sheets can simplify and enhance your contact management process.
Frequently Asked Questions
Can I use a formula to combine first and last names into one column?
You can combine the first and last names using the CONCATENATE or & operator. For example, if the first name is in column A and the last name is in column B, you can use the formula: =CONCATENATE(A2, ” “, B2)
How do I sort contacts by last name?
You can use the Sort range function to sort your contacts by last name. Highlight the columns that contain your contact information. Go to Data > Sort range. Select the column that contains the last names and choose A → Z for alphabetical sorting.
How do I create an automatic timestamp for when a new contact is added?
You can use the NOW function to record the date and time a new contact is added. Place the following formula in the column where you want the timestamp: =IF(A2<>””, NOW(), “”)
The Bottom Line:
One keeps you awake. The other gets work done.
A month of coffee: $80
A month of FileDrop: $19
Why not have both?

