
Keeping tabs on who owes you money can get tricky, especially as your business grows. Thankfully, Google Sheets is a lifesaver for tracking accounts receivable. It’s user-friendly, accessible from anywhere, and, best of all, it’s free.
What Is Account Receivable and Why Is It Important?
Accounts receivable is a way of knowing and tracking customers who still owe you money for products or services you’ve already provided. It’s a big deal because it directly affects your business’s cash flow and overall financial health.
When you manage it well, you ensure there’s enough cash coming in to cover day-to-day expenses, support growth, and keep your business running smoothly.
But if it’s not tracked properly, unpaid invoices can pile up, leading to cash shortages and unnecessary stress. That’s why keeping a close eye on your accounts receivable isn’t just important—it’s essential for a strong and stable business.
“This practice often produces a receivables asset that is one of the largest tangible assets on a company’s balance sheet. A review of the 2004 Fortune 500 certainly reveals this truth. Receivables ranked among the top three tangible assets for 75% of the top 100 companies. Surprisingly, management of this multi-million (or multi-bil- lion) dollar asset rarely receives much senior management attention, except when a serious problem develops. The custodians of the receivables asset are similar to umpires of a baseball game; they are not noticed unless they do”
― Accounts Receivable Management Best Practices
Step 1: Open a New Google Sheet
Go to Google Sheets and click “+ Blank” template to create a new spreadsheet. Then, give your spreadsheet a name for proper organization. You can use “Accounts Receivable 2025.”

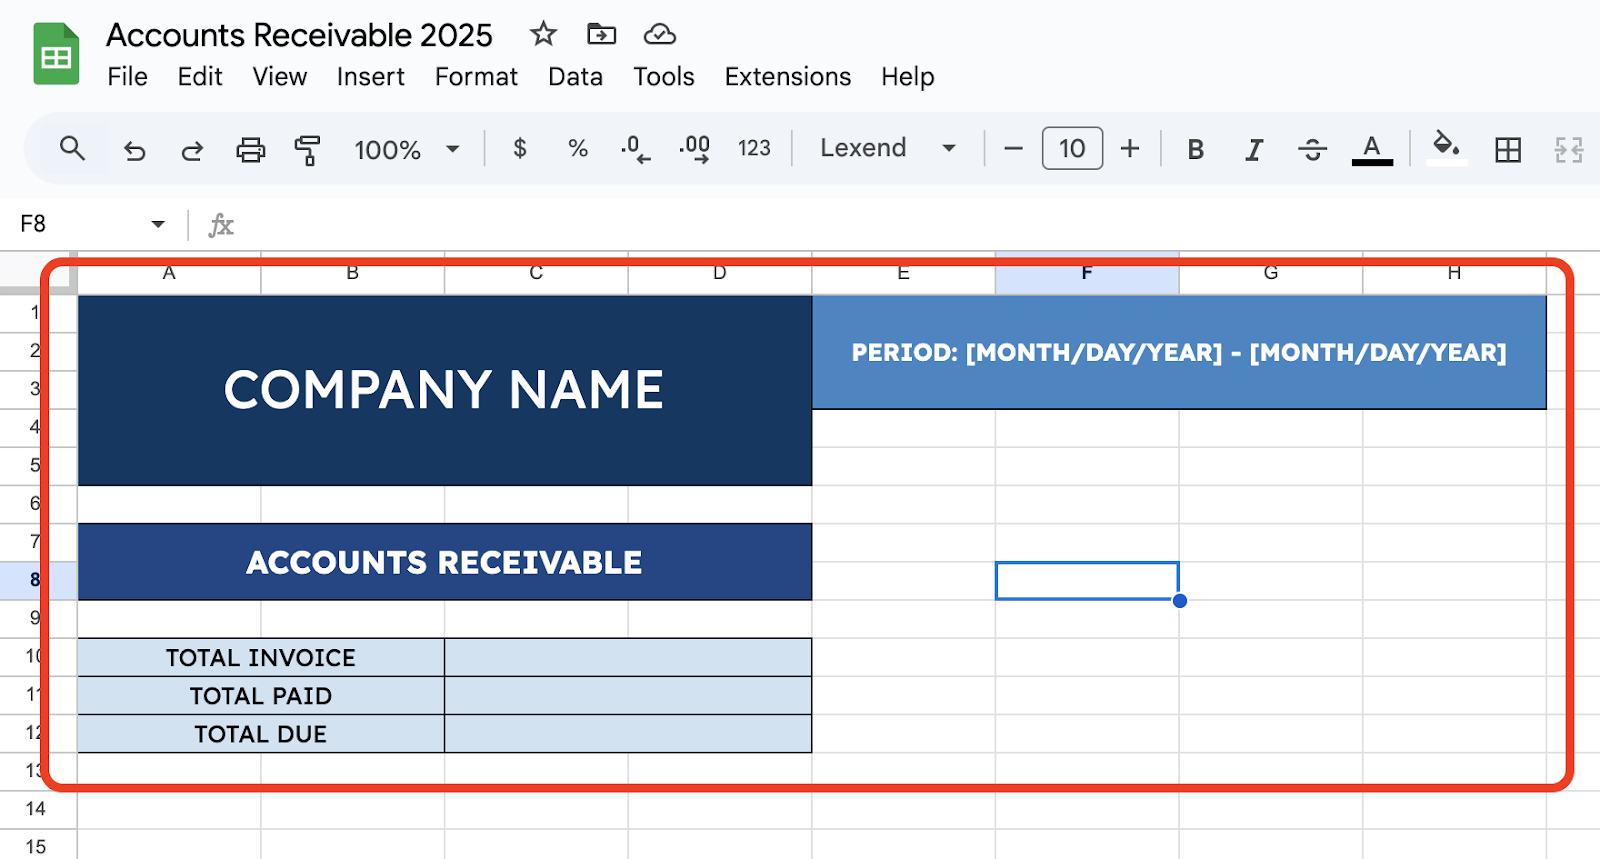
Step 2: Set Up Headings
Before you start with the table, let’s create first the headings for your tracker. You may need the following:
- Company Name
- Period Covered
- Total Invoice
- Total Paid
- Total Due
These headings and categories will help you automate and summarize the information that you will use in your table.
Step 3: Create Categories
Now that your main header is done, you can create the categories for your Account Receivable table. Use the following categories:
- Invoice No.
- Invoice Date
- Customer Name
- Invoice Amount
- Amount Paid
- Balance
- Due Date
- Terms
- Item/Service Description

Step 4: Add Your Data
Once your table is complete and all set, you can add your data for the columns. However, you must leave the Balance column empty since we will be using a formula to automate that column.

Step 5: Add Formula to Get the Balance
To get the Balance, you can use the DIFFERENCE formula. For example, on the first cell under the Balance column, enter:
=E16-F16
Assuming that E16 is the Invoice Amount and F16 is the Amount Paid. Then, drag the formula to the rest of the range.

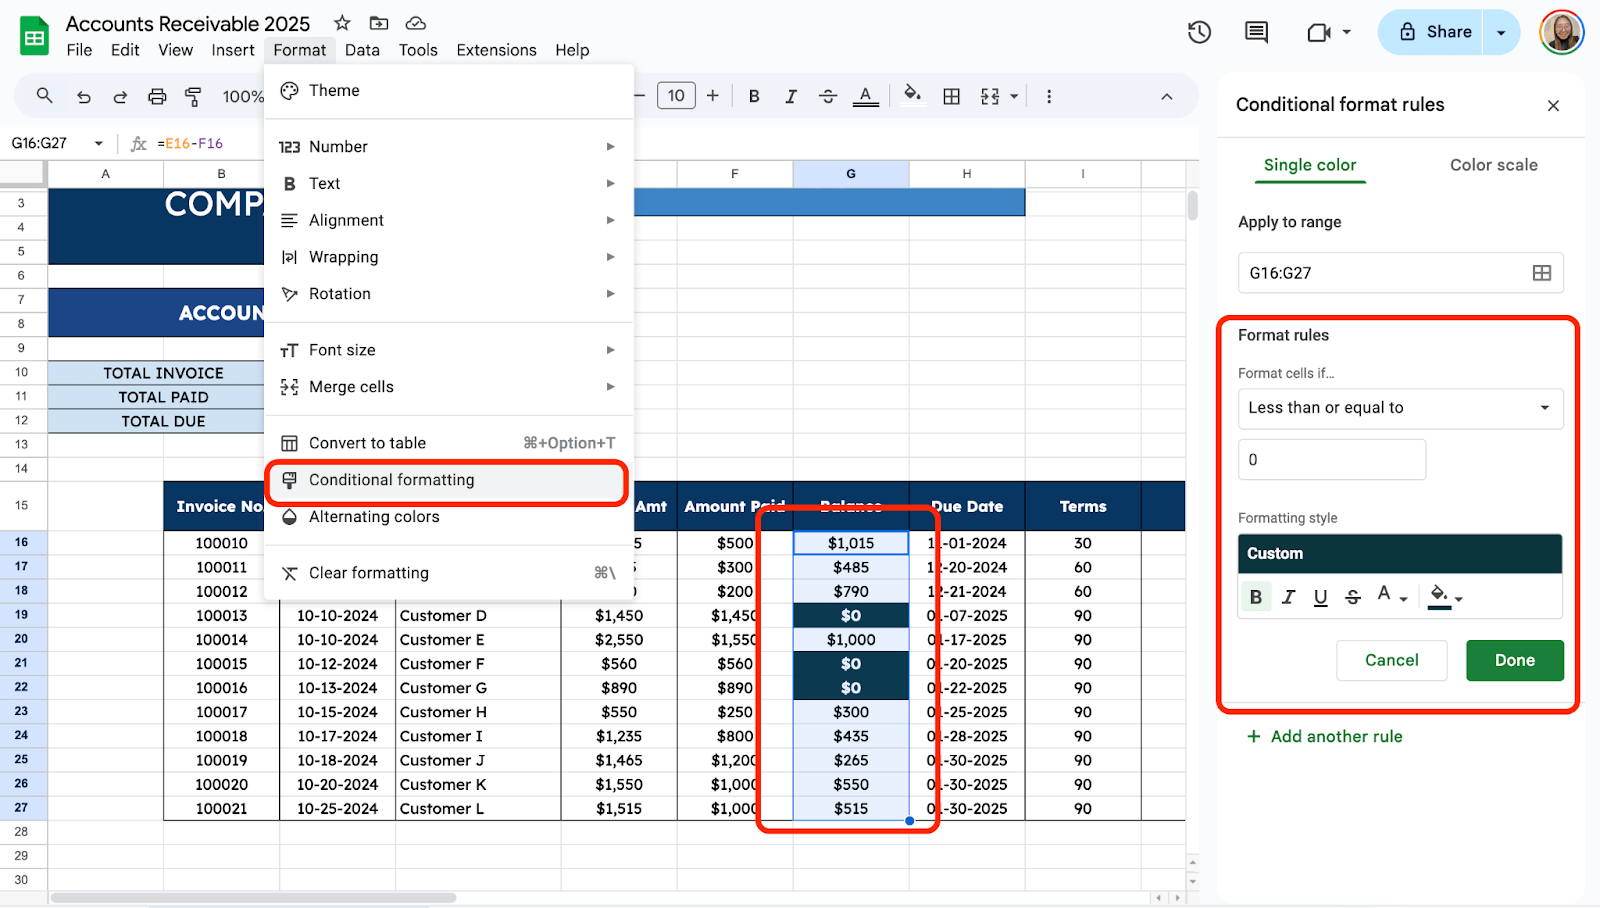
Step 6: Add Conditional Formatting
Highlight balance by adding a visual alert. Select the Balance column. Go to Format > Conditional Formatting. Then click “Less Than or Equal To” and enter “0” under the value.
This makes it easy to spot unpaid invoices.
Step 7: Add Formulas to the Summary Table
After setting up your table, you can add formulas to the Total fields we added earlier. Use the =SUM formula to get the totals.

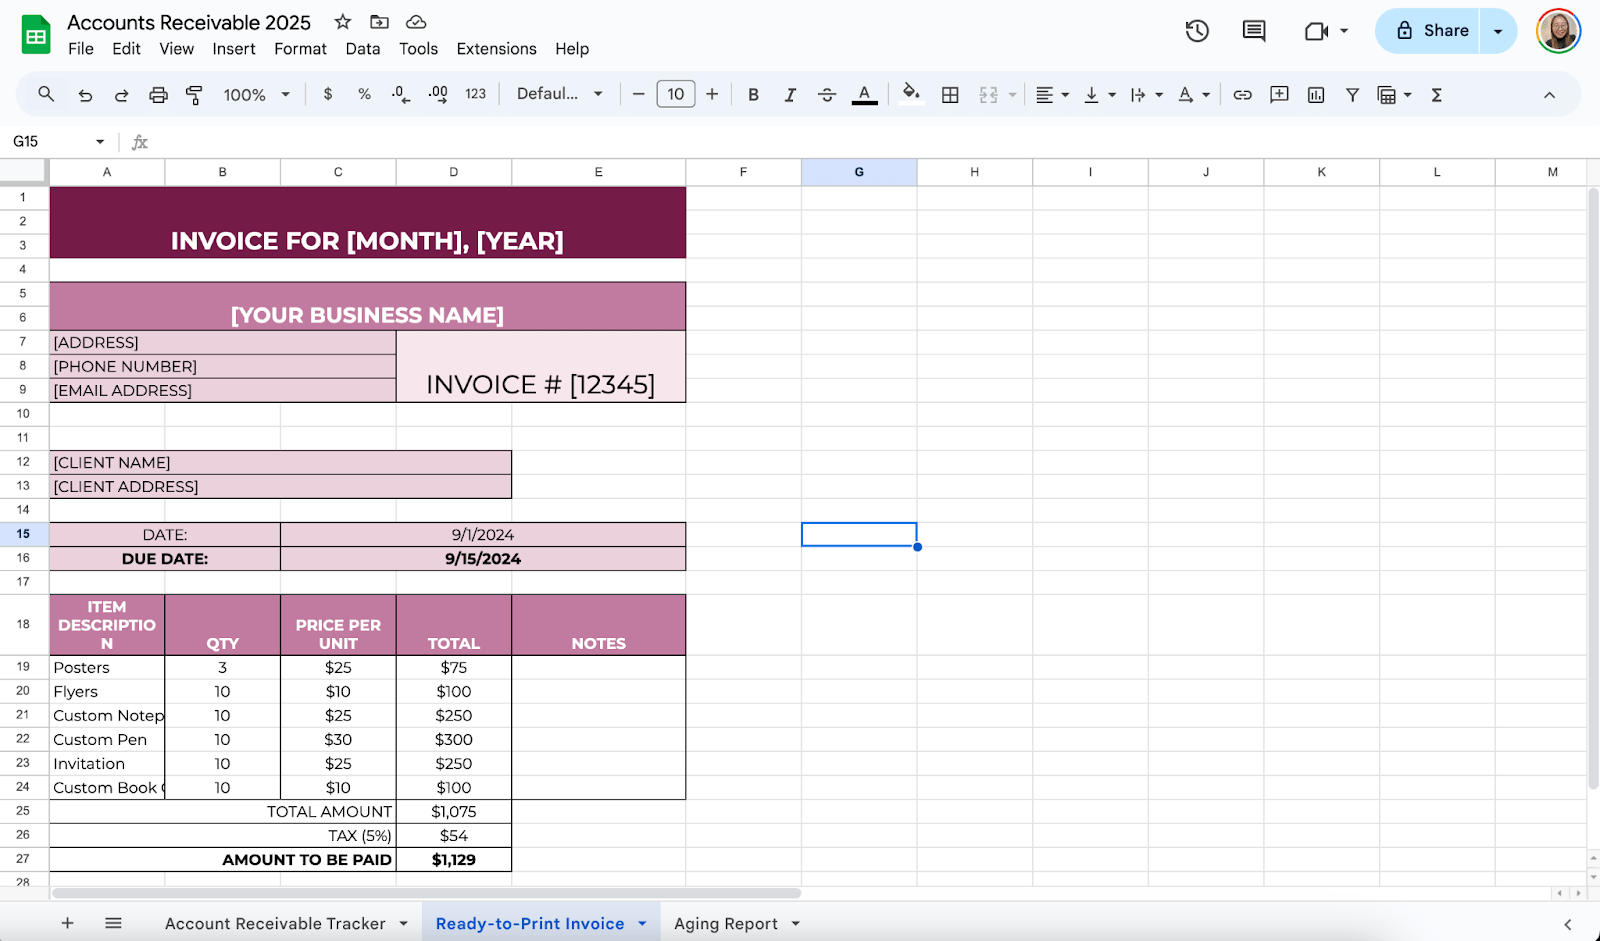
Step 8: Create a Ready-to-Print Invoice Tab
Aside from tracking payment dues, one good thing about Google Sheets is you can create your invoice template. All you need to do is click the “+” icon at the bottom part of the spreadsheet to add a new tab. Then, double-click the name to rename it.
I will use the invoice template in this Ready-to-Print Invoice tab. You can learn how to create the invoice template here.
Step 9: Create Another Tab for Aging Report
Click the “+” icon again to create the Aging Report Tab. This tab will help you automate and highlight payment dues.
Use the following columns for the Aging Report tab summary table:

Step 10: Proceed with the Outstanding Amount Table
To get the summary of paid and unpaid payments, use the following labels for the Outstanding Amount table:
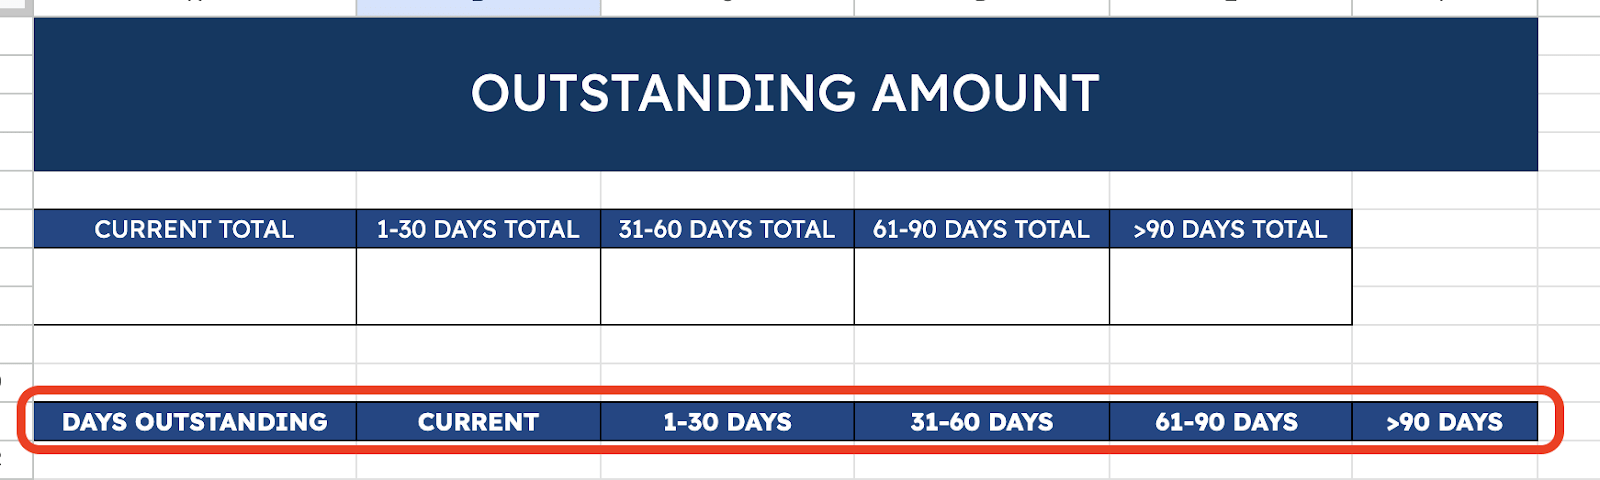
Under the Days Outstanding column, use the formula:
=IF(TODAY()>’Account Receivable Tracker’!H16,TODAY()-‘Account Receivable Tracker’!H16,0)

Then, drag down the formula to automate the computation of outstanding days from the Account Receivable Tab.
Share the sheet with your team or clients if needed. Click the Share button in the top-right corner. Enter email addresses and set permissions. Make sure everyone involved can access and update the sheet in real-time.

Get the Free Account Receivable Tracker
Get a copy of the free Account Receivable Tracker. I’ve populated some cells as examples, but you can customize them as needed.
Final Thoughts
Managing your accounts receivable isn’t just about tracking numbers—it’s about building a rhythm that keeps your business financially healthy. Think of it as nurturing relationships with your customers while keeping your operations steady. Approach it with consistency and care, and you’ll stay organized and create a stronger foundation for growth and success.
Frequently Asked Questions
Can I customize the template further?
Google Sheets allows you to add new columns for details like payment methods or notes. Use charts (Insert > Chart) to create visual summaries of overdue invoices or payment trends. Automate updates with Google Apps Script if you’re comfortable with coding.
How do I create a running total of payments received?
Use a running total formula in the “Payment Received” column. For example, in G2, enter =SUM($F$2:F2) and drag it down. This will show a cumulative total of all payments.
What formula should I use to identify overdue payments?
Combine the IF and TODAY functions, such as =IF(D2<TODAY(),”Overdue”,”On Time”).


