The holiday season is a time for giving but can quickly get expensive. A well-organized gift budget can help you keep track of your spending and avoid overspending. You can easily create a holiday gift budget tracker using Google Sheets and conditional formatting to stay on top of your finances.
Why Is It Important to Track Your Budget for Holiday Gifts?
Keeping track of your holiday gift budget is a simple way to make sure your generosity doesn’t lead to financial stress. A thoughtful budget helps you spread your funds evenly among loved ones, ensuring everyone gets a meaningful gift. It lets you give from the heart without risking your financial stability, making the joy of giving even sweeter.
Step 1: Open a New Google Sheets File
Open a blank Google Sheets file. Then, rename it by clicking the “Untitled Spreadsheet” at the top corner of your spreadsheet. You can easily name it “Holiday Gift Budget Tracker” for easier organization.

Step 2: Set Up Your Table
In the first few rows, create headers for the information you’ll track. You can use the following categories:
- Name (for the person you’re buying gifts for)
- Gift Idea
- Budget
- Actual Cost
- Purchased?
You can also add another cell where you can input whether the gifts are for your family or friends.

Step 3: Enter Your Data
Now, start entering the names of people you’re buying gifts for, the gifts you’re considering, your budget for each gift, and any costs if you’ve already made purchases. You’ll leave the “Purchased?” column empty for now.

Step 4: Add Conditional Formatting for Overspending
This is where conditional formatting comes in handy. You can use it to highlight any gifts where the cost exceeds your budget.
Select the cells under the “Actual Cost” column where you’ll input the gift prices (let’s say you start from D6 down). Click on Format in the top menu and choose Conditional formatting.
Under Format cells if, select Greater than and type the cell reference of your budget column (for example, if your budget starts in C6, type =C6). Choose a formatting style, like a red background, to alert you when you’ve gone over budget. Click Done to apply the rule.

Step 5: Add a Dropdown for Purchased Gifts
Next, let’s make it easy to see which gifts you’ve already bought. This will help you stay organized and ensure you don’t accidentally buy something twice.
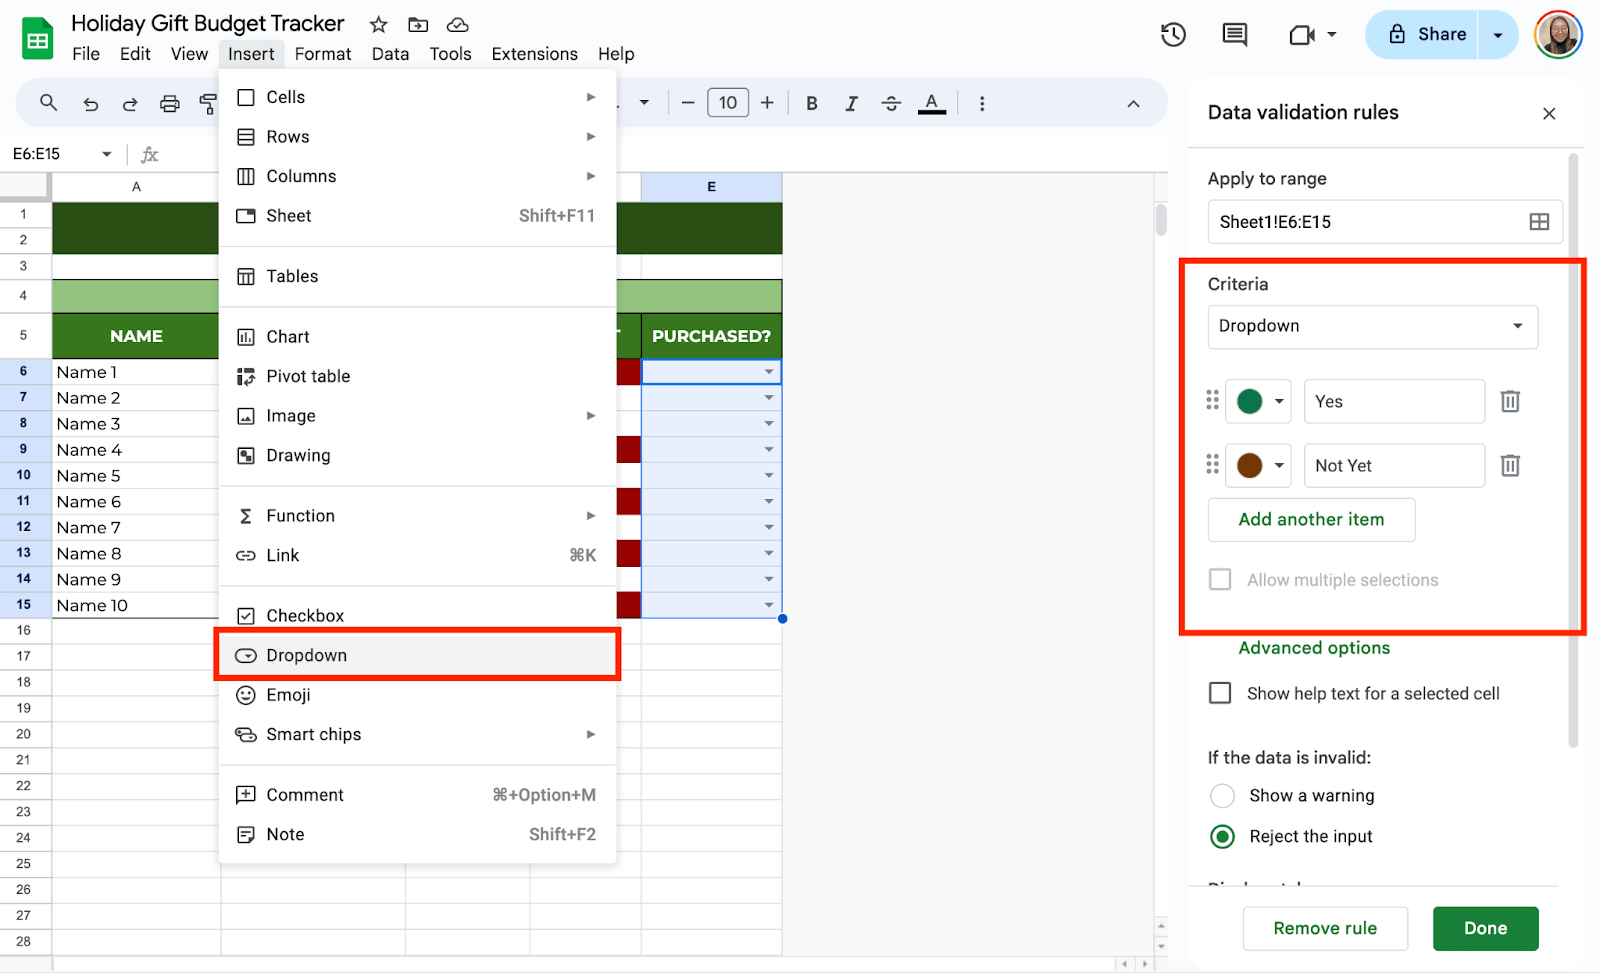
To do this, select the cells under the “Purchased?” column. Click Insert from the toolbar and select Dropdown.
Add the options, such as Yes and Not Yet, and set them to your preferred colors. Then, click Done to apply the rule.
Step 6: Add Total Budget and Actual Cost
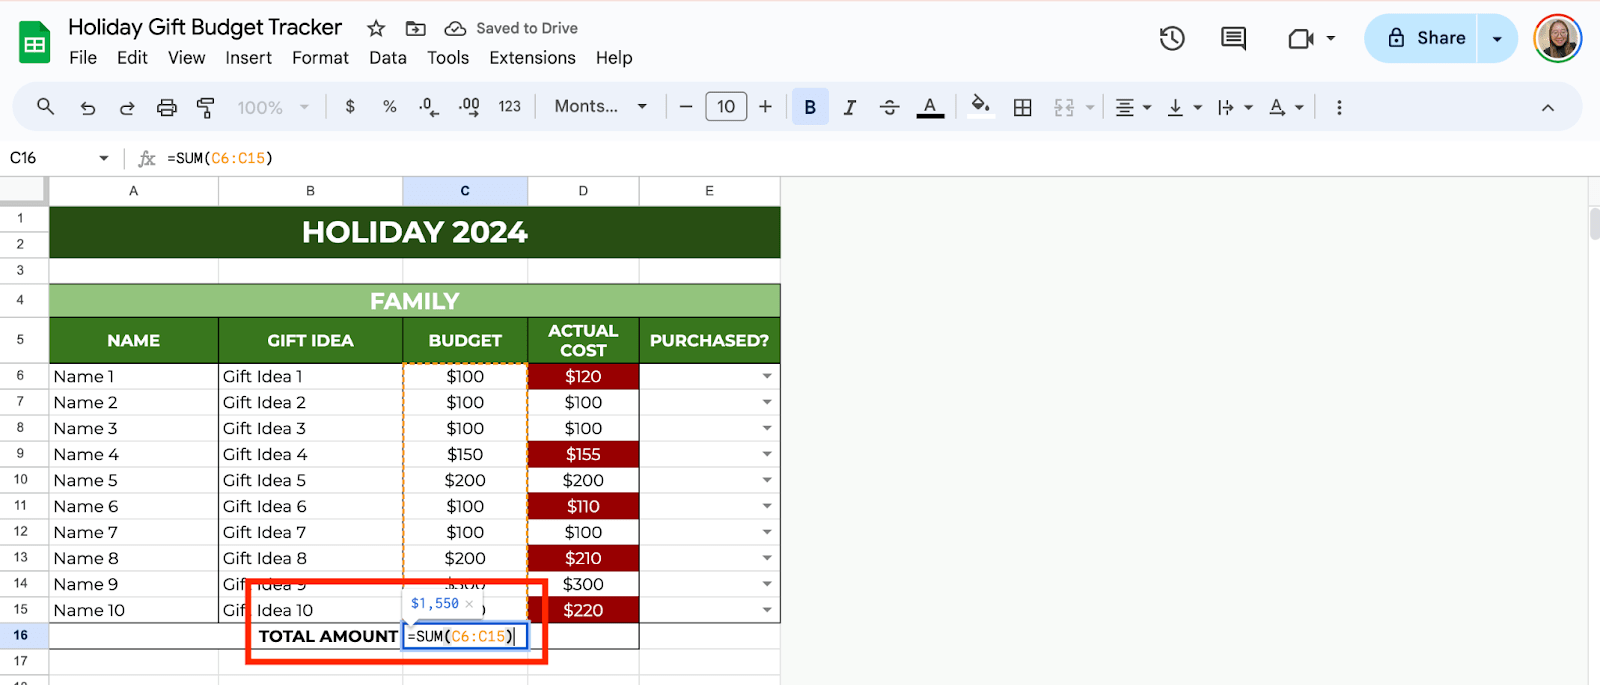
At the bottom of your “Budget” and “Actual Cost” columns, you can calculate the total amount you plan to spend and what you’ve actually spent.
In an empty cell below your “Budget” column, type =SUM(C6:C15). This will add up all the amounts in your budget.
In a cell below your “Actual Cost” column, type =SUM(D6:D15) to total up your actual spending.
You can even apply conditional formatting here to highlight if your total spending goes over your total budget.

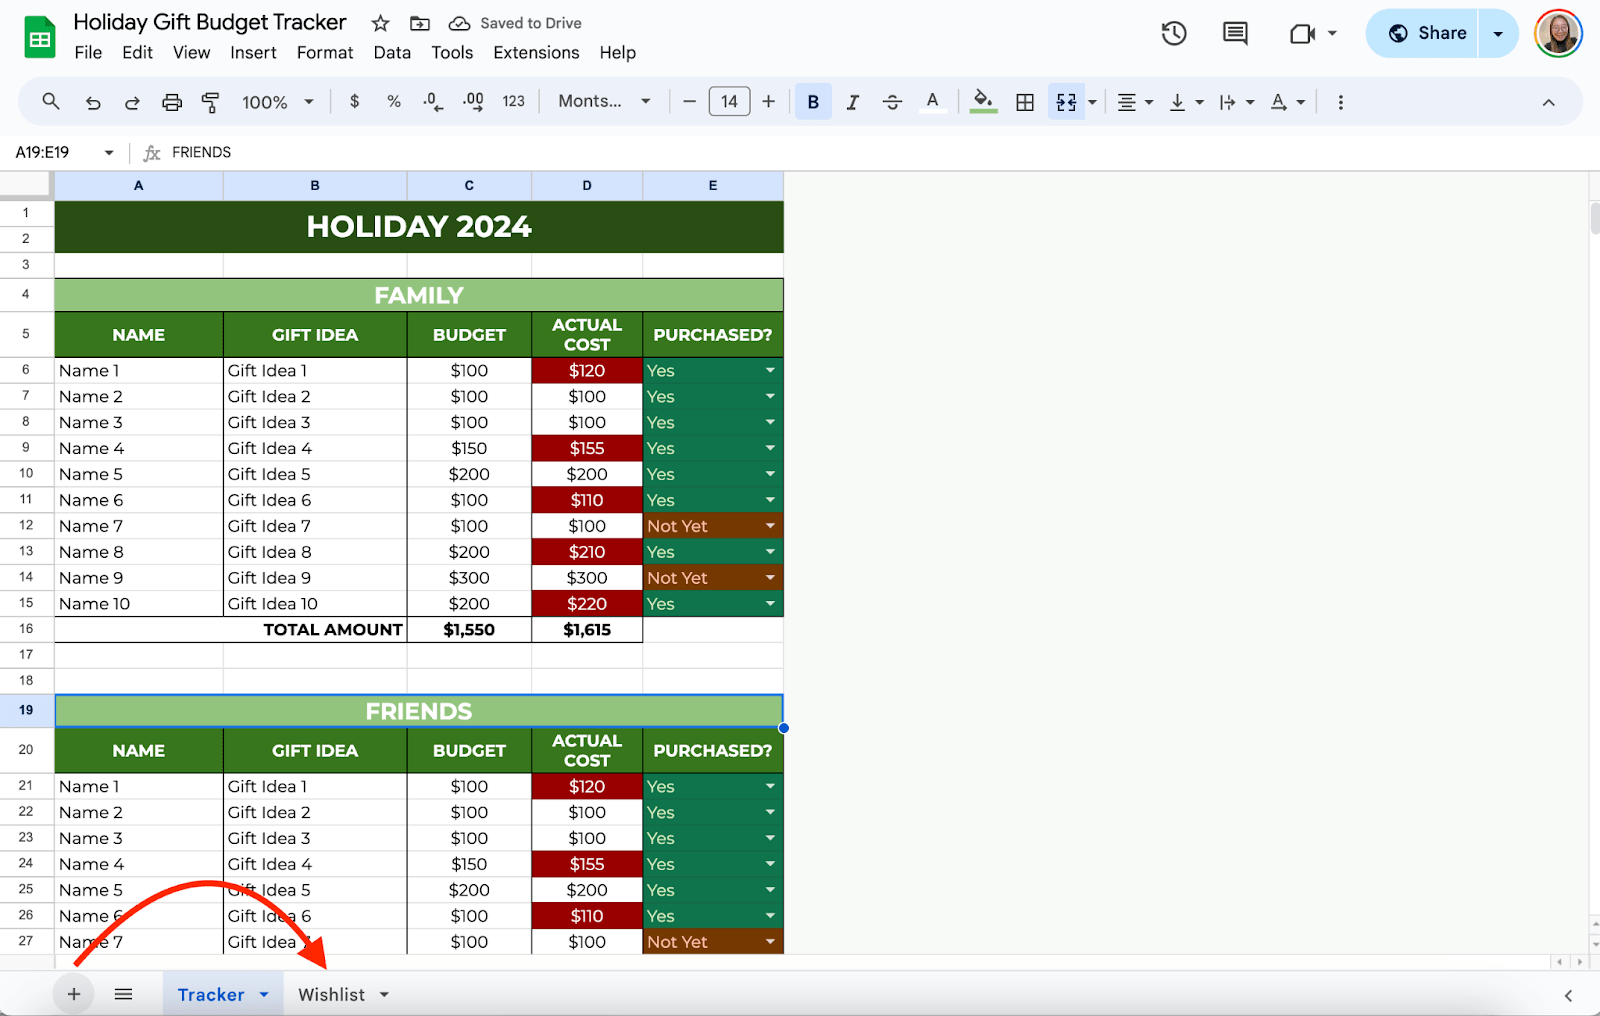
Step 7: Add a Wishlist (Optional)
You can also add a wishlist to your holiday gift budget tracker. To do this, click the “+” icon at the bottom corner of the spreadsheet to create a new one. Then, rename your new sheet to properly organize it.
Now, in your new spreadsheet, create categories, such as:
- Name
- Wishlist
- Notes
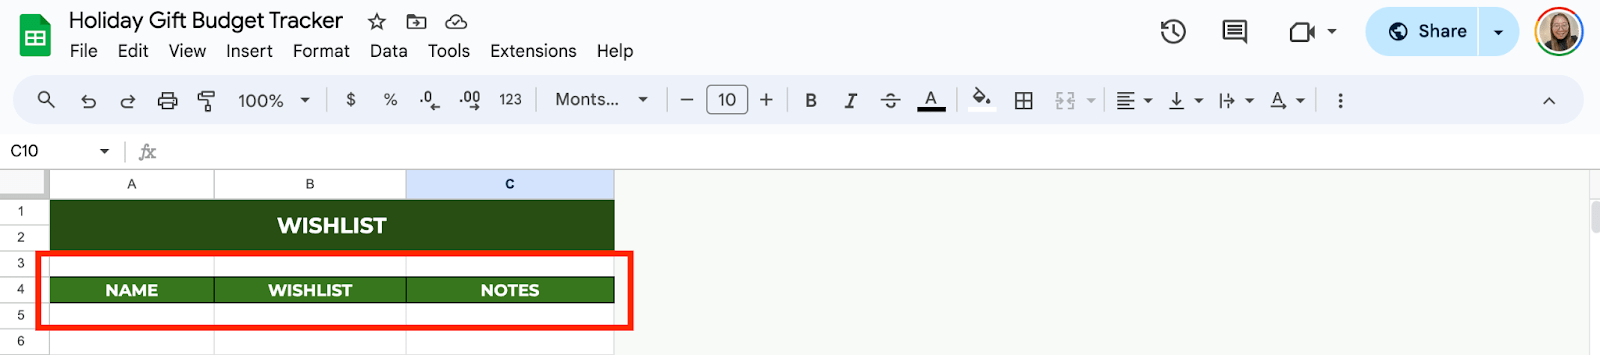
Enter the information you need for your wishlist.

If you’re organizing gifts with family or friends, you can easily share your Google Sheets file with them. Simply click the Share button in the top right corner and send them the link. This way, everyone can stay updated on the gift list and budget.

Get the Free Holiday Gift Budget Tracker
Get a copy of the free Holiday Gift Budget Tracker. I’ve already populated the cells as example, but you can customize them as needed.
Final Thoughts
With this holiday gift budget tracker, you can manage your spending, keep track of your purchases, and make the holidays less stressful. Google Sheets makes it easy to update your list, and conditional formatting helps you stay within budget at a glance. Play around with the formatting options and make the tracker work for you. Happy holiday shopping!
Frequently Asked Questions
Is there a way to automatically update the ‘Status’ column when I input the actual cost?
While conditional formatting doesn’t automatically change cell content, you can use Google Sheets’ built-in formulas, such as IF statements, to update the ‘Status’ column based on the presence of an ‘Actual Cost.’ For instance, an IF formula can set the status to ‘Bought’ when an actual cost is entered, though you may need to adjust the formula based on your specific tracker setup.
How do I protect specific parts of the tracker from being edited by others?
You can protect certain cells or ranges by selecting the range you want to protect. Go to Data > Protected sheets and ranges. Set the permissions to limit who can edit that part of the sheet. This feature is helpful if you’re sharing the tracker but want to make sure only specific people can update important information.
Can I set multiple rules for the same column in conditional formatting?
Yes, Google Sheets allows multiple conditional formatting rules for the same column. For example, you can set one rule to highlight when the gift cost exceeds the budget and another to highlight when the gift is purchased. The formatting will change depending on which condition is met.
The Bottom Line:
One keeps you awake. The other gets work done.
A month of coffee: $150
A month of FileDrop: $19
Why not have both?

