
Handling a photography business requires balancing creativity with organization. Staying organized can make or break your success, from tracking expenses to managing client bookings. Google Sheets is a tool that can streamline your workflow, allowing you to manage various aspects of your business effectively.
Why Is It Important to Keep a Record of Your Photography Business?
Keeping good records is key to running a successful photography business. First off, it helps you stay on top of your finances, making it easier to track income and expenses, plan budgets, and prepare for taxes. It also lets you see how your business is doing, highlighting which services are most profitable and showing where you can improve.
Step 1: Open a New Spreadsheet
Go to Google Sheets and click the “+ Blank” template to open a new spreadsheet. Once open, rename your sheet by clicking Untitled Spreadsheet on the top corner. In this example, I’ll use “Photography Projects in 2024.”

Step 2: Set Up Your Headings
One way to make an effective record for your photography business is to have an organized template. You can use the following categories, such as:
- Month
- Date
- Time
- Lead
- Client Name
- Brand
- Venue
- Service Provided
- Status (Completed, Ongoing, Cancelled, Scheduled)
- Price
- Balance
- Expenses
- Profit

Step 3: Enter Project Details
Now that your categories are ready, it’s time to fill in the fields with accurate information on your previous, ongoing, and upcoming projects.

Step 4: Use a Dropdown Menu
For categories that require recurring information, such as Lead, Service Provided, and Status, you can use the dropdown menu feature of Google Sheets.
All you have to do is select the range where you want to put the list, then click Insert > Dropdowns. You can now add the options or items that you need.

Step 5: Format Your Numbers
Under Price, Balance, Expenses, and Profit, you may notice that the numbers are not in the currency format. To change them, select the cells and click the “$” icon from the toolbar.

Step 6: Calculate Your Profit
You can use the DIFFERENCE function to know how much you earn from a project. To do this, click the first cell under the Profit category, then use “=I4-K4” (assuming that I4 is where the Price is and K4 is the Expenses).

Drag the formula to the rest of the column to automatically compute your profit.
Step 7: Get the Average and Total Monthly Profit
Under the table you created for the month, create a field for the Average Price, Average Profit, and Total Monthly Profit.
To get the Average Price & Profit, use =AVERAGE(cell range). For example: =AVERAGE(I4:I10) for the Average Price and =AVERAGE(L4:L10) for the Average Profit.

To get the Total Monthly Profit, use =SUM(cell range). For example: =SUM(L4:L10).

Step 8: Add a Summary
Copy the table you made for the entire month and paste it under to add a new table. Once you’ve completed creating January to December tables, it’s time to add a Summary field for the entire year.
Create two columns, one for the current year and the other for the previous year. It will serve as a comparison table on how much you’ve earned and how many events you’ve done.

Then, use labels such as “TOTAL # OF EVENTS/PROJECTS, PROJECTS UNDER $1,000, PROJECTS UNDER $2,000, PROJECTS OVER $2,000, TOTAL SALES, TOTAL GROSS PROFIT.”

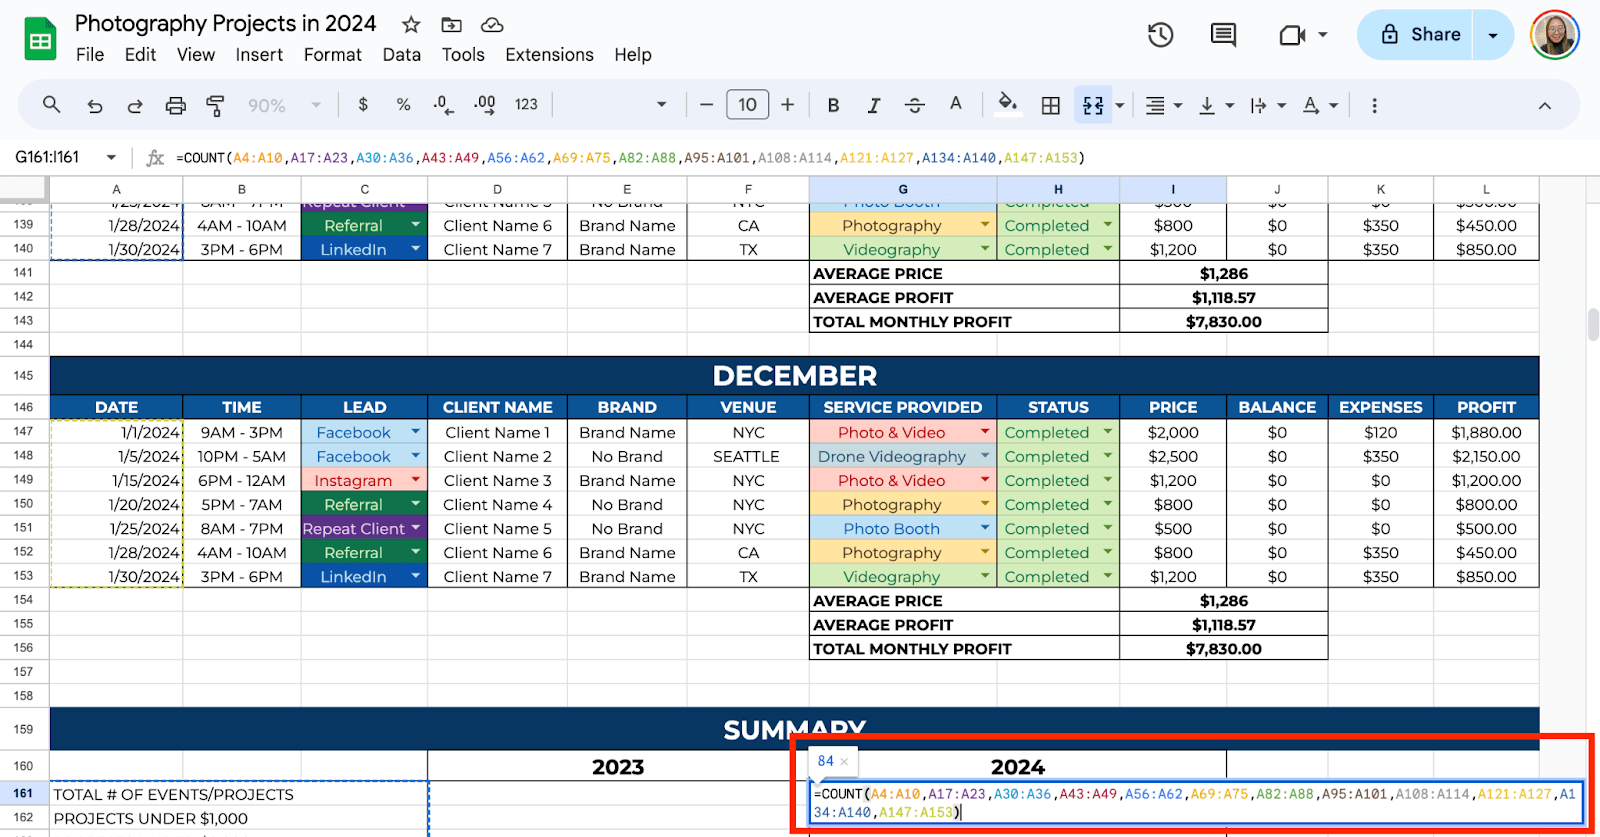
To calculate the total # of events you’ve done, use the formula:
=COUNT(A4:A10,A17:A23,A30:A36,A43:A49,A56:A62,A69:A75,A82:A88,A95:A101,A108:A114,A121:A127,A134:A140,A147:A153)
To calculate PROJECTS UNDER $1,000, PROJECTS UNDER $2,000, and PROJECTS OVER $2,000, use:
=SUM(COUNTIF({I134:I140, I147:I153,I121:I127,I108:I114,I95:I101,I82:I88,I69:I75,I56:I62,I43:I49,I30:I36,I17:I23,I4:I10},”<1000″))
(Change < and > symbols depending on the label. The example provided above is for the Projects Under $1,000.)

To get the Total Sales, use the =SUM function:
=SUM(I4:I10,I17:I23,I30:I36,I43:I49,I56:I62,I69:I75,I82:I88,I95:I101,I108:I114,I121:I127,I134:I140,I147:I153)

To get the Total Gross Profit, use the formula:
=SUM(I13,I26,I39,I52,I65,I78,I91,I104,I117,I130,I143,I156)

Step 9: Add a New Sheet for Another Year
Click the “+” icon on the lower corner of the spreadsheet to add a new sheet. Then, rename it by double-clicking it.

Now, you can copy and paste the template you use for the first sheet you’ve made.
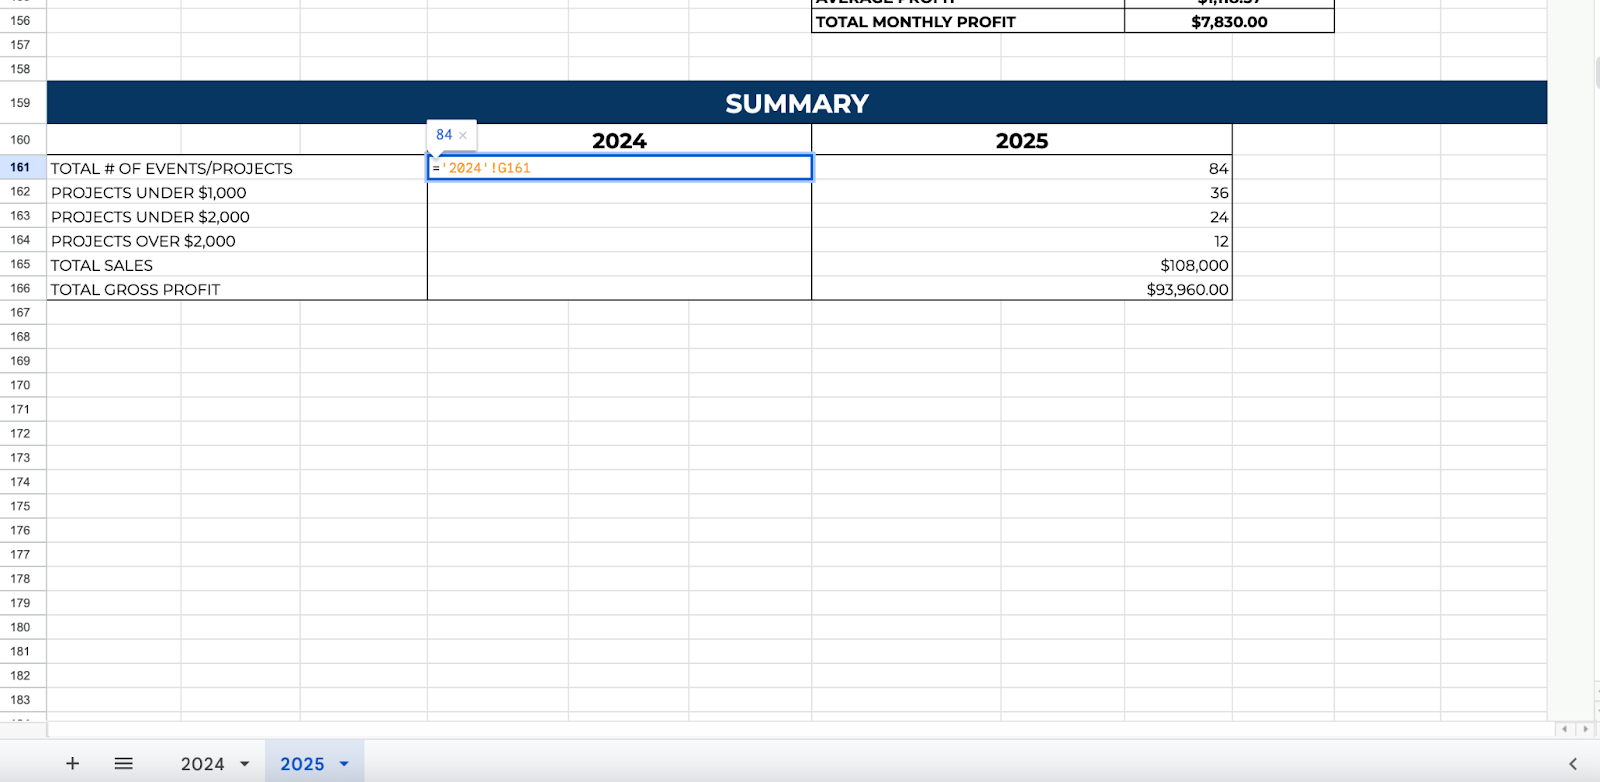
Step 10: Extract Information from Different Sheet
To fill in the previous year’s information under the Summary table, use the formula:
=’2024′!G161
(The example is the Total # of Events of the previous year. 2024 is the sheet name, and G161 is the cell where the result of Total # of Events is.)
Do the same thing for the rest of the fields. Simply enter “=” and select the “2024” sheet, then click the cell to get the information.
Get the Free Photography Business Management Template
Get a copy of the free Photography Business Management Template. I’ve already populated some cells as examples, but you can customize them as needed.
Final Thoughts
Incorporating Google Sheets into your photography business can greatly simplify your workflow. From tracking clients and expenses to managing schedules and equipment, this tool helps keep everything organized in one place. With these simple and easy-to-follow steps, you’ll save time, stay on top of important details, and focus more on your passion for photography.
Frequently Asked Questions
How do I keep track of unpaid invoices in Google Sheets?
Use Conditional Formatting to highlight unpaid invoices. In your “Payment Status” column, select the cells and go to Format > Conditional formatting. Set a rule to highlight any cell that contains “Pending” or “Unpaid” to remind you of overdue payments.
Can I automatically calculate profits in Google Sheets?
Yes, by subtracting your total expenses from your total income. Use the SUM formula to total your income in one cell and your expenses in another. Then, in a new cell, use a simple formula like =Income_Total – Expenses_Total to get your profit.
How can I track client bookings and avoid double bookings?
Use the Data Validation feature to prevent duplicate dates. Select the column where you enter shoot dates, go to Data > Data Validation, and set the criteria to reject duplicate entries. This way, you’ll avoid booking two clients for the same time slot.
The Bottom Line:
One keeps you awake. The other gets work done.
A month of coffee: $150
A month of FileDrop: $19
Why not have both?

